Hardware specification:
  SoC: MediaTek MT7981B
  Flash: ESMT F50L1G41LB 128MB
  RAM: ESMT M15T2G16128A DDR3 256MB
  Ethernet: 3x 1G
  Button: Reset, WPS

MAC addresses
  LAN:	Label MAC (stored in Factory partition offset 0x1fef20)
  WAN:	LAN + 1
  WiFi:	LAN

Official LED layout, from left to right:
  [power] [internet] [wps] [wifi] [lan3/2/1] [wan]

Redefinition for OpenWrt:
  [power]: used for led-boot, led-failsafe, and led-running
  [internet]: used for WAN RX/TX indication
  [wps]: used for led-upgrade
  [wifi] and [lan3/2/1]: unchanged
  [wan]: used for WAN link indication

Installing OpenWrt:
  - Setup a tftp server on your PC. Copy
    xxx-preloader.bin, xxx-bl31-uboot.fip and
    xxx-initramfs.itb to tftp root directory.
  - Connect to the router via ssh or telnet,
    username: useradmin, password is the web
    login password of the router.
  - Backup all critical flash partitions with
    the following commands where x.x.x.x is
    the IP of your PC.

    IP=x.x.x.x
    cd /dev
    for d in /sys/class/mtd/mtd?; do
      if [ "$(cat $d/name)" = "BL2" ]; then
        tftp -l $(basename $d) -r bl2.img -p $IP
      elif [ "$(cat $d/name)" = "FIP" ]; then
        tftp -l $(basename $d) -r fip.bin -p $IP
      elif [ "$(cat $d/name)" = "Factory" ]; then
        tftp -l $(basename $d) -r factory.bin -p $IP
      fi
    done
    for d in /sys/devices/virtual/ubi/ubi0/ubi0_*; do
      [ "$(cat $d/name)" != "customer" ] && continue
      tftp -l $(basename $d) -r customer -p $IP
      break
    done

  - Flash with the following commands:

     cd /tmp
     tftp -r xxx-preloader.bin -g x.x.x.x
     tftp -r xxx-bl31-uboot.fip -g x.x.x.x
     mtd write xxx-preloader.bin spi0.0
     mtd write xxx-bl31-uboot.fip FIP
     mtd erase ubi

  - Set a static ip(192.168.1.254) for your PC.
    And then reboot the router. It will run
    initramfs image automatically.
  - After openwrt boots up, perform sysupgrade
    via web UI.

Reverting to the vendor firmware:
  - Setup a tftp server on your PC with ip
    address 192.168.1.254. And make sure
    bl2.img, fip.bin, factory.bin and customer
    are located in tftp root directory.
  - Power off the router.
  - Press and hold WPS key, then power on
    the router.
  - Release WPS key, when internet/wifi/wps
    leds are blinking.
  - Wait until internet/wifi/wps leds light
    up, power off the router.
  - Press and hold reset key, power up the
    router, release reset key 15s later.
  - Connect to http://192.168.1.1, now you
    can upload vendor .bin firmware.

Uboot netconsole:
  Uboot netconsole can be enabled by WPS
  or reset key.

  - Setup a linux PC with ip 192.168.1.254.
    Open a new terminal and execute
    'stty -isig -echo cbreak; nc -lup 6666'
  - Press and hold WPS(or reset) key, then
    power on the router.
  - Release key once internet/wifi/wps leds
    are all on.
    NOTE: don't hold the key more than 5s
    after internet/wifi/wps leds on, or it
    will try to revert to vendor firmware.
  - 5s later, uboot bootmenu will show on
    the terminal.

Signed-off-by: Zhiwei Cao <bfdeh@126.com>
Link: https://github.com/openwrt/openwrt/pull/18631
Signed-off-by: Hauke Mehrtens <hauke@hauke-m.de>
This commit replaces the 7-8 spaces with 1 tab to modify the indentation appropriately.

Signed-off-by: Brian Lee <larte332@gmail.com>
Link: https://github.com/openwrt/openwrt/pull/21018
Signed-off-by: Hauke Mehrtens <hauke@hauke-m.de>
Kebidumei AX3000-U22 is one of many clones of the same range extender
that can be found on Aliexpress or other Chinese portals.

The easiest way to identify this model is by searching for "AX3000
Repeater" and picking the device that looks like mine [0].

Specification:
- SoC:     MediaTek MT7981B (1.3 GHz)
- RAM:     256 MB
- Flash:   16 MB SPI NOR
- Ports:   1 x 1 GbE
- Antenna: 6 (2 fake)
- WiFi:    MediaTek dual-band WiFi 6
  - 2.4 GHz: b/g/n/ax, MIMO 2x2
  - 5 GHz:   a/n/ac/ax, MIMO 2x2
- Buttons: Reset & WPS
- LEDs:    Ethernet (green), Status (red, green, blue)
- Power:   110–240 V AC (internal PSU, board uses 12 V DC)
- Serial:  unmarked connector on PCB
           [1: Vcc, 2: RX, 3: TX, 4: GND]

Install via OEM web UI:
1. Use reset button to perform factory reset.
2. Connect PC to LAN port and obtain DHCP address.
3. Upload the sysupgrade image via OEM firmware upgrade page,
   e.g. http://192.168.18.1/upgrade.html
4. After reboot, hold reset button to clear leftover vendor config.

Install via serial:
1. Connect serial console (115200 8N1).
2. Enter the console.
3. Backup mtd4 partition if you want to restore OEM FW later.
4. Download image.
5. Run 'sysupgrade -n'.

Revert to stock:
1. Run sysupgrade without keeping config using mtd4 backup.

[0] https://openwrt.org/_media/media/kebidumei_ax3000-u22.png

Signed-off-by: Pawel Dembicki <paweldembicki@gmail.com>
Link: https://github.com/openwrt/openwrt/pull/20287
Signed-off-by: Hauke Mehrtens <hauke@hauke-m.de>
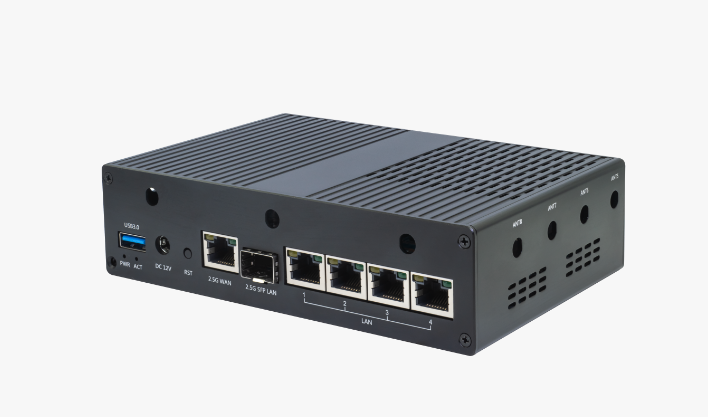
This commit adds support for Keenetic KN-1812/Netcraze NC-1812

Device specification
--------------------
SoC Type:   MediaTek MT7988D, Cortex-A73, 64-bit
RAM:        1024MB DDR4 Micron MT40A512M16TB-062E:R
Flash:      SPI NAND Winbond W25N02KV (256 MiB)
Ethernet:   4x1GbE (internal MT7988 built-in) + 2.5GbE (internal MT7988 phy) + 10GbE (RTL8261BE)

WLAN:       MT7992AV
WLAN 2g:    MediaTek MT7975N, b/g/n/ax/be, MIMO 4x4
WLAN 5g:    MediaTek MT7977B, a/n/ac/ax/be, MIMO 4x4
LEDs:       5 LEDs, 1 power green, 1 internet green,
            2x fn green, 1 wlan green, gpio-controlled
Button:     4 (Reset, WPS, FN1, FN2)
USB port:   Yes, 1xUSB3.2 and 1xUSB2.0 (via GL850G)
Power:      12 VDC, 3 A

Notes:
 * The device supports dual boot mode
 * Fn2 led reassigned to wlan 2.4

Flash instruction:
The only way to flash OpenWrt image is to use tftp recovery mode in U-Boot:

1. Configure PC with static IP 192.168.1.2/24 and tftp server.
2. a) Keenetic
      Rename "openwrt-mediatek-filogic-keenetic_kn-1812-squashfs-factory.bin"
      to "KN-1812_recovery.bin" and place it in tftp server directory.
   b) Netcraze
      Rename "openwrt-mediatek-filogic-netcraze_nc-1812-squashfs-factory.bin"
      to "NC-1812_recovery.bin" and place it in tftp server directory.
3. Connect PC with ethernet port, press the reset button, power up
   the device and keep button pressed until status led start blinking.
4. Device will download file from server, write it to flash and reboot.

Signed-off-by: Maxim Anisimov <maxim.anisimov.ua@gmail.com>
Link: https://github.com/openwrt/openwrt/pull/20737
Signed-off-by: Hauke Mehrtens <hauke@hauke-m.de>
This AX3000 flying saucer-shaped device is sold under a few names:
- Widelantech WAP430X
  http://www.widelantech.com/?m=home&c=View&a=index&aid=131
- Felicomm
- UeeVii UAP200 (sold on amazon.com)
True name, as marked on the PCB and as appears in the DTS, is WAP430X.

Hardware:
- SoC: Mediatek MT7981B
- RAM: 256MiB DDR3
- ROM: 16MiB NOR flash (Winbond 25Q128JVSQ)
- Wired: one GbE RJ45 port
- Wireless: Mediatek MT7976CN DBDC
- Antennas: Internal (two 2.4 GHz 4.5 dBi, three 5 GHz 6 dBi)
- GPIO: two blue LEDs (status, WLAN), one button (reset)
- Power: DC5521 (12V) or 802.3af PoE (48V 0.3A)
- UART: J500 on PCB [3v3] (Rx) (Tx) (Gnd), 115200n

Original firmware is GECOOS 8.0_2024081000, a fork of OpenWrt 21.02
created by Widelantech. All ports are closed except 443 (web management
interface) and 80 (redirects to 443). UART is locked down, but U-Boot
bootloader is friendly.

Installation is done via UART (see note below).

Method 1: press any key during boot to enter MTK U-Boot bootloader,
then choose option 2 (Upgrade firmware) and upload sysupgrade binary
via TFTP (or via Xmodem).

Method 2: put sysupgrade binary on a webserver (http, not https); after
GECOOS loads, choose option 4 (固件在线升级 = online firmware upgrade)
in the menu and enter the URL to the sysupgrade binary.

Note: GECOOS has a slick web management, and firmware can be uploaded
at https://6.6.6.6/#/system/sysupgrade but it's still not clear how to
convert the sysupgrade binary to a factory binary accepted by the web
interface (WIP).

Signed-off-by: Rani Hod <rani.hod@gmail.com>
Link: https://github.com/openwrt/openwrt/pull/20402
Signed-off-by: Hauke Mehrtens <hauke@hauke-m.de>
Unneeded semicolon

WARNING comparing pointer to 0

WARNING: NULL check before some freeing functions is not needed.

WARNING: casting value returned by memory allocation function to (u32 *)

ERROR: allocation function on line 378 returns NULL not ERR_PTR on failure

Signed-off-by: Rosen Penev <rosenp@gmail.com>
Link: https://github.com/openwrt/openwrt/pull/19932
Signed-off-by: Hauke Mehrtens <hauke@hauke-m.de>
The RTL8367S_GSW config for filogic target is not set by default.
This switch model can be recognized by multiple drivers. Configure it as an optional module instead of default set in config.

Signed-off-by: Schneider Azima <Schneider-Azima12@protonmail.com>
Link: https://github.com/openwrt/openwrt/pull/19187
Signed-off-by: Hauke Mehrtens <hauke@hauke-m.de>
ASUS TUF-AX4200Q(TUF 小旋风Pro WiFi6 AX4200) is a home router that adds an additional 2.5G Ethernet port to ASUS TUF-AX4200.

Hardware
- - - - - - - -
- SOC   : MediaTek MT7986
- RAM   : 512MB DDR3
- FLASH : 256MB SPI-NAND (Winbond W25N02KV)
- WIFI  : Mediatek MT7986 DBDC 802.11ax 2.4/5 GHz
- ETH   : MediaTek MT7531 Switch
          MaxLinear GPY211C 2.5 N-Base-T PHY (WAN)
          MaxLinear GPY211C 2.5 N-Base-T PHY (LAN)
- UART  : 3V3 115200 8N1 (Pinout silkscreened / Do not ocnnect VCC)

Installation
- - - - - - - -
Vendor-UI Method:

1. Download or make the OpenWrt initramfs.trx image
2. Connect the PC via LAN to one of the yellow router ports and wait until your PC to get a DHCP lease.
3. Browse to http://192.168.50.1/
4. If your router is brand new, finish the setup process and log into the Web-UI.
5. Navigate to Administration -> Firmware Upgrade and upload the downloaded OpenWrt image.
6. Wait for OpenWrt to boot. Transfer the sysupgrade image to the device using SCP and install using sysupgrade.

   $ sysupgrade -n <path-to-sysupgrade.bin>

TFTP Method:

1. Download the OpenWrt initramfs image.
   Copy the image to a TFTP server reachable at 192.168.1.70/24.
   Rename the image to tufax4200q.bin.

2. Connect the PC with TFTP server to the TUF-AX4200Q.
   Set a static ip on the ethernet interface of your PC.
   (IP address: 192.168.1.70, subnet mask: 255.255.255.0)
   Connect to the serial console,
   interrupt the autoboot process by pressing '4' when prompted.

3. Download & Boot the OpenWrt initramfs image.

   $ setenv ipaddr 192.168.1.1
   $ setenv serverip 192.168.1.70
   $ tftpboot 0x46000000 tufax4200q.bin
   $ bootm 0x46000000

4. Wait for OpenWrt to boot.
   Transfer the sysupgrade image to the device using SCP and install using sysupgrade.

   $ sysupgrade -n <path-to-sysupgrade.bin>

(based on support for ASUS RT-AX52 by achterin and trx image generation by remittor)

Signed-off-by: Brian Lee <larte332@gmail.com>
Link: https://github.com/openwrt/openwrt/pull/20900
Signed-off-by: Hauke Mehrtens <hauke@hauke-m.de>
Upstream is strongly considering removing of_gpio.h. As of this commit,
3 upstream drivers remain with actual usage.

Get ahead of upstream and use the GPIOD API before the OF one goes away.

Rework to remove mediatek,reset-pin in favor of the standard
reset-gpios.

Fix wrong high GPIO.

Signed-off-by: Rosen Penev <rosenp@gmail.com>
Link: https://github.com/openwrt/openwrt/pull/20088
Signed-off-by: Hauke Mehrtens <hauke@hauke-m.de>
Backport upstream patch to add support for the ESMT F50L1G41LC flash
chip. It is used in multiple Cudy products manufactured starting
November 2025.

Link: https://github.com/openwrt/openwrt/pull/20962
Signed-off-by: Hauke Mehrtens <hauke@hauke-m.de>
All users of regular CONFIG_NVMEM_U_BOOOT_ENV have been converted to use
layouts.

CONFIG_NVMEM_U_BOOT_ENV selects the layout variant anyway so this is
safe to do.

Signed-off-by: Rosen Penev <rosenp@gmail.com>
Link: https://github.com/openwrt/openwrt/pull/16376
Signed-off-by: Hauke Mehrtens <hauke@hauke-m.de>
The child node "partitions" doesn't have "reg" property. Hence, we
don't need to use "#address-cells" and "#size-cells" to describe the
reg property information.

Signed-off-by: Shiji Yang <yangshiji66@outlook.com>
Link: https://github.com/openwrt/openwrt/pull/20942
Signed-off-by: Christian Marangi <ansuelsmth@gmail.com>
Drop all kernel 6.6 patches, hacks, backports and configuration support,
and remove the CONFIG_LINUX_6_6 guarded conditional in filogic.mk.

Signed-off-by: Mieczyslaw Nalewaj <namiltd@yahoo.com>
Link: https://github.com/openwrt/openwrt/pull/20943
Signed-off-by: Christian Marangi <ansuelsmth@gmail.com>
Devices package:
  Add missing USB3 driver

Device tree:
  Fix model name and pwm usage
  Add missing supply for I2C and USB
  Update network port names based on the shell image [1]

[1] https://docs.banana-pi.org/bpi-r4_lite/banana_pi_bpi-r4_lite_case_1.png

Fixes: 8b6c6978 ("mediatek: add support for BananaPi BPi-R4 Lite")
Signed-off-by: Chukun Pan <amadeus@jmu.edu.cn>
There is no reason to limit USB to 2.0 mode by default. This
limitation should be done when both gmac2 and USB are enabled.

Signed-off-by: Chukun Pan <amadeus@jmu.edu.cn>
Remove I2C, PCIe, PWM, UART and USB from the MT7987A SoC dtsi.
These should not be enabled by default, but rather enabled based
on the device.

Signed-off-by: Chukun Pan <amadeus@jmu.edu.cn>
This commit increases the SPI bus frequency from 20 to 52 MHz. Reduces boot
time by 2s. Below is a performance comparison.

Before:
root@OpenWrt:~# dd if=/dev/mtd1 of=/dev/null bs=10M count=1 status=progress
10485760 bytes (10 MB, 10 MiB) copied, 1.68404 s, 6.2 MB/s

After:
root@OpenWrt:~# dd if=/dev/mtd1 of=/dev/null bs=10M count=1 status=progress
10485760 bytes (10 MB, 10 MiB) copied, 0.819222 s, 12.8 MB/s

Taken from PR #18752 as each device should be tested individually, so I have
created a separate PR for this.

Signed-off-by: Sky Huang <SkyLake.Huang@mediatek.com>
Signed-off-by: Aleksander Jan Bajkowski <olek2@wp.pl>
Link: https://github.com/openwrt/openwrt/pull/20853
Signed-off-by: Hauke Mehrtens <hauke@hauke-m.de>
The initramfs.trx image can be flashed from the web interface of factory
firmware.

Unfortunately, the default boot command of the bootloader does not load
the ramdisk in the FIT image. This means that the image can only be
built when the option TARGET_ROOTFS_INITRAMFS_SEPARATE is disabled.

Tested with firmware 3.0.0.4.388_33965 (U-Boot 2022.10 / 2.0.0.5).

Signed-off-by: Jan Hoffmann <jan@3e8.eu>
Link: https://github.com/openwrt/openwrt/pull/20841
Signed-off-by: Hauke Mehrtens <hauke@hauke-m.de>
Hardware
--------

SOC:   MediaTek MT7981
RAM:   512MB DDR4
FLASH: 128MB SPI-NAND
WIFI:  Mediatek MT7915 (integrated) 2x2 802.11ax 2.4 / 5 GHz
ETH:   Mediatek MT7981 internal 1 GbE PHY
UART:  3V3 115200 8N1 (Pinout silkscreened / Do not connect VCC)

Installation
------------

1. Download the OpenWrt initramfs image. Copy the image to a TFTP server
2. Connect the TFTP server to the EAX17. Conect to the serial console,
   interrupt the autoboot process by pressing '0' when prompted.
3. Download & Boot the OpenWrt initramfs image.

   $ tftpboot openwrt.bin
   $ bootm

4. Wait for OpenWrt to boot. Transfer the sysupgrade image to the device
   using scp and install using sysupgrade.

   $ sysupgrade -n <path-to-sysupgrade.bin>

Signed-off-by: Jascha Sundaresan <flizarthanon@gmail.com>
Link: https://github.com/openwrt/openwrt/pull/20354
Signed-off-by: Hauke Mehrtens <hauke@hauke-m.de>
Product name: Wavlink WL-WN536AX6 Rev a "Mighty LX2"
Product link: https://www.wavlink.com/en_us/product/WL-WN536AX6.html

Specifications:
SOC: MT7986AV
RAM: 512MB DDR4
Flash: 128MB SPI NAND
Ports: 4 LAN (1G) & 1 WAN (2.5G)
WIFI: MT7976PN + MT7975N
LEDs: 8 (STATUS, WIFI, WAN, LAN1, LAN2, LAN3, LAN4, PWR)
USB: 1 (3.0)

MAC table, same as stock firmware:
LAN: 80:3F:5D:xx:xx:x1 partition "hw" at 0x44e (ASCII)
WAN: 80:3F:5D:xx:xx:x2 partition "hw" at 0x460 (ASCII)
2G: 80:3F:5D:xx:xx:x3
5G: 80:3F:5D:xx:xx:x4

* Installation with OEM WebUI:

Note: Make sure PC is connected on LAN1 port. The OEM firmware has an unknown root password and settings are kept after upgrading firmware. Therefore, a customized Openwrt firmware is needed to remove the root password on login, by adding `passwd -d root` to /etc/init.d/bootcount. The WebUI does a filename check so the customized firmware is named accordingly.

1. Download modified firmware file `WAVLINK_WN536AX6-A_M36AX6_V250320-WO-437baca-modified.bin` from https://github.com/ses1er/firmware-misc/tree/main/wavlink/wl-wn536ax6a
2. Log into WebUI on default IP: http://192.168.20.1
3. Browse to More (top menu) -> System -> Firmware Upgrade.
4. Under `Local Upgrade` section, check the device to be upgraded and upload downloaded modified firmware. Click `UPLOAD FILE`, then `APPLY`
5. Wait about 2 minutes (ignore progress bar), and browse to http://192.168.20.1. You should see LUCI login page. Username is root and no password.
6. Browse to `System -> Backup/Flash Firmware`, click on `Flash Image`, click `Browse` and locate `openwrt-mediatek-filogic-wavlink_wl-wn536ax6-a-squashfs-sysupgrade.bin` file.
7. Uncheck `Keep settings and retain the current configuration` and click `Continue`.
8. Router will now be set to IP 192.168.1.1 which is the Openwrt default.

* Installation with UART:

Note: Having UART connected while cold booting the device will result in a kernel panic when initializing wifi. I've found this workaround:
1. Power off the device and ensure UART is not connected to PC.
2. Power up the device, when lights come on, plug in UART.
3. Warm boots and soft restarts will not cause kernel panic for the duration of device being powered on. Repeat steps for subsequent cold boots.

1. Configure TFTP server with IP 192.168.1.66. Copy `openwrt-mediatek-filogic-wavlink_wl-wn536ax6a-initramfs.itb` to TFTP root.
2. Interrupt boot by pressing 0.
3. Run the following in Uboot console: `setenv serverip 192.168.1.66; setenv ipaddr 192.168.1.1; tftpboot 0x46000000 openwrt-mediatek-filogic-wavlink_wl-wn536ax6-a-initramfs.itb; bootm`
4. Transfer `openwrt-mediatek-filogic-wavlink_wl-wn536ax6-a-squashfs-sysupgrade.bin` to device:
   (`scp -O openwrt-mediatek-filogic-wavlink_wl-wn536ax6-a-squashfs-sysupgrade.bin root@192.168.1.1:/tmp/`)
5. Run the following on device: `sysupgrade -n /tmp/openwrt-mediatek-filogic-wavlink_wl-wn536ax6-a-squashfs-sysupgrade.bin`

Signed-off-by: Qing W. <ses1er@gmail.com>
Tested-by: Martin Blumenstingl <martin.blumenstingl@googlemail.com>
Link: https://github.com/openwrt/openwrt/pull/20760
Signed-off-by: Hauke Mehrtens <hauke@hauke-m.de>
Replace hardcoded numbers with the dt-bindings drive strength macros
defined in "dt-bindings/pinctrl/mt65xx.h".

Signed-off-by: Donghyun Ko <nyankosoftware@gmail.com>
Link: https://github.com/openwrt/openwrt/pull/20894
Signed-off-by: Hauke Mehrtens <hauke@hauke-m.de>
This board is also as known as LC-HX3001

Hardware specification:
  SoC: MediaTek MT7981B 2x A53
  Flash: Foresee F35SQA001G 128 MB SPI-NAND
  RAM: 256MB DDR3
  Ethernet: 4x 10/100/1000 Mbps
  Switch: MediaTek MT7531AE
  WiFi: MediaTek MT7976C
  Button: Reset, Mesh
  Power: DC 12V 1A

Gain SSH access:
Method 1:
1. Connect UART Adapter to the router
2. UART pins are enabled, set the root password with passwd command
   start the dropbear instance on port 22

Method 2:
1. Login into web interface, and restore the router with SSH enabled configuration.
2. After reboot Default Web interface password will be 12345678
   SSH password is empty

Flash instructions:
1. Connect to HX21, backup everything, especially 'Factory' part.
3. Write new FIP:
   mtd write openwrt-mediatek-filogic-hx_21-bl31-uboot.fip FIP
4. Set static IP on your PC:
   IP 192.168.1.254/24, GW 192.168.1.1
5. Serve OpenWrt initramfs image using TFTP server.
6. Wait for TFTP recovery to complete.
7. After OpenWrt has booted, perform sysupgrade.
8. To write new BL2
   Install mtd-rw
   opkg update && opkg install kmod-mtd-rw
   insmod mtd-rw i_want_a_brick=1
   mtd write openwrt-mediatek-filogic-imou_hx21-preloader.bin bl2

Signed-off-by: Jahidul Islam <hello@jahid.io>
Link: https://github.com/openwrt/openwrt/pull/20753
Signed-off-by: Hauke Mehrtens <hauke@hauke-m.de>
According to the factory uboot and firmware[1], the ubi size is set
to 512 MiB (0x20000000) and it exceeds the size of the flash, after
that the uboot and kernel resizes it to 114.5 MiB (0x7280000) instead
of 114.125 MiB (0x7220000). The mismatch of the ubi size causes
kernel fails to read ubi volumes and throws panic.

Trim whitespaces while at it.

1. https://github.com/immortalwrt/immortalwrt/issues/2123#issuecomment-3523744128

Fixes: c908fc7d95 ("mediatek: add support for Zbtlink ZBT-Z8102AX v2")
Signed-off-by: Tianling Shen <cnsztl@immortalwrt.org>
Link: https://github.com/openwrt/openwrt/pull/20769
Signed-off-by: Hauke Mehrtens <hauke@hauke-m.de>
Specification
-------------
- SoC       : MediaTek MT7981BA dual-core ARM Cortex-A53 1.3GHz
- RAM       : DDR3 256Mbytes, ESMT M15T2G16128A
- Flash     : 128Mbytes NAND Flash, ESMT F50L1G41LB
- WLAN      : MediaTek MT7976CN dual-band Wi-Fi 6
  - 2.4GHz  : b/g/n/ax, MU-MIMO
  - 5GHz    : a/n/ac/ax, MU-MIMO
- Ethernet  : MediaTek MT7531AE
  - LAN     : 10/100/1000 Mbps x4
  - WAN     : 10/100/1000 Mbps x1
- UART      : 1x4 pin header hole on PCB
  - 3.3V, RX, GND, TX (115200, 8N1)
- Buttons   : WPS, Reset
- LEDs      : 1x CPU (Amber/Blue)
              1x Wi-Fi (Amber/Blue)
              1x WAN activity (Amber/Blue)
              4x LAN activity (Amber/Blue)
- Power     : 12VDC, 1A (Center positive polarity)

Note: The LED color is amber or blue, depending on your router's color
(black/white).

MAC address
-----------
+-----------+-------------------+-----------+
| Interface | MAC               | Algorithm |
+-----------+-------------------+-----------+
| WLAN 2.4G | B0:38:6C:xx:xx:xx | label     |
| WLAN 5G   | B2:38:6C:4x:xx:xx |           |
| WAN       | B0:38:6C:xx:xx:xx | label + 1 |
| LAN       | B0:38:6C:xx:xx:xx | label + 3 |
+-----------+-------------------+-----------+
The WLAN 2.4G MAC address was found in 'Factory' partition, 0x4

Installation
------------
1. Download the OEM recovery software (ipTIME Firmware Wizard (11ac))
   from the manufacturer's website
2. Download the *squashfs-factory.bin file from the OpenWrt website
3. Press a reset button, and power up the router (keep pressing the reset button)
4. Wait more than 10 seconds until the CPU LED stop blinking
5. Connect the router (LAN port) to the PC
6. Run the OEM recovery software and follow the instructions
7. Select the *squashfs-factory.bin file during the router recovery process
8. Wait for the router to boot from *squashfs-factory.bin

Limitation: Triggering the WLAN LED for activity on both phy0 (2.4GHz) and phy1 (5GHz)
----------
Currently, the UCI doesn't support triggering a single LED for activity
on multiple WLAN interfaces. As a temporary workaround, the LED is
configured to only indicate activity on `phy1`. If you wish to monitor
`phy0` instead, you must change the device from `phy1-ap0` to `phy0-ap0`
in the LuCI LED configuration.

Signed-off-by: Donghyun Ko <nyankosoftware@gmail.com>
Link: https://github.com/openwrt/openwrt/pull/20771
Signed-off-by: Hauke Mehrtens <hauke@hauke-m.de>
Teltonika RUTC50 has a 5G modem. Install uqmi by default to control the
modem with the default package set.

Signed-off-by: David Bauer <mail@david-bauer.net>
Add mt7987-2p5g-phy-firmware to DEVICES_PACKAGES of the MT7987A RFB as
well as the BananaPi R4 Lite.

Signed-off-by: Daniel Golle <daniel@makrotopia.org>
The ports are physically labelled in reverse order on the device.
This patch aligns logical names with physical ones.
LED order on front of device is correct after this patch.

Fixes: 9d66b8b312
Signed-off-by: Thibaut VARÈNE <hacks@slashdirt.org>
Link: https://github.com/openwrt/openwrt/pull/20528
Signed-off-by: Hauke Mehrtens <hauke@hauke-m.de>
This commit adds support for TP-LINK BE450.

Device specification
--------------------
SoC Type:   MediaTek MT7988D, Cortex-A73, 64-bit
RAM:        512MB
Flash:      SPI NAND GigaDevice (128 MiB)
Ethernet:   MediaTek MT7531AE (3 Ports) + 2.5GbE (internal MT7988 phy) + 10GbE (RTL8261N)

WLAN:       MT7992
WLAN 2g:    MediaTek MT7975N, b/g/n/ax/be, MIMO 4x4
WLAN 5g:    MediaTek MT7979N, a/n/ac/ax/be, MIMO 4x4
LEDs:       8 LEDs, 1 status blue, 2x WIFI blue, 2x Internet
	        blue/orange, 1 LAN blue, 1 usb blue, 1 wps blue, gpio-controlled
Button:     2 (Reset, WPS)
USB port:   Yes
Power:      12 VDC, 2 A
Connector:  Barrel
Bootloader: Main U-Boot - U-Boot 2023.10-rc4. Additionally, ubi0
            partition contain "seconduboot" (also U-Boot 2023.10-rc4)

Serial console (UART), unpopulated, located near the power connector
---------------------
heatsink
|   |
|   |
|   |     +----+-----+------+-------+               +-----------------+
|   |     | TX |  RX |  GND | +3.3V |               | power connector |
+---+     +----+-----+------+-------+               +-----------------+
                                  |
                Don't connect ----+

Disassemble: rm the 2 screws at the bottom and the one at the backside.
             un-clip the case starting at the edge above the LEDs.

Installation (UART)
-------------------
1. Place OpenWrt initramfs image on tftp server with IP 192.168.1.2
2. Attach UART, switch on the router and interrupt the boot process by
   pressing 'Ctrl-C'
3. Load and run OpenWrt initramfs image:
      tftpboot 0x50000000 openwrt-mediatek-filogic-tplink_be450-initramfs-kernel.bin && bootm 0x50000000
4. Run 'sysupgrade -n' with the sysupgrade OpenWrt image

Note: the 10GbE (RTL8261N) is only working if reverting this Realtek target specific commit:
      b77fa45d12

      The second ubi partition (ubi1) is empty and there is no known
      dual-partition mechanism, neither in u-boot nor in the stock firmware.

      NMBM is not used.

Not Working: WED, if activated, MT7992 isn't recognized any more.

Signed-off-by: Dirk Buchwalder <buchwalder@posteo.de>
Link: https://github.com/openwrt/openwrt/pull/20398
Signed-off-by: Hauke Mehrtens <hauke@hauke-m.de>
Also the MT7987 RFB accidentally already set the not-yet-existing
mt798x-2p5g-phy-firmware-internal package as one of the DEVICE_PACKAGES.
This currently breaks the build, so remove it for now. Also remove stray
'blkid' package from DEVICE_PACKAGES which was accidentally copied from
MediaTek's SDK.

Fixes: 9de7189ed4 ("mediatek: build image for MT7987 RFB")
Signed-off-by: Daniel Golle <daniel@makrotopia.org>
Because the firmware has not yet been accepted in linux-firmware we
cannot yet package mt7987-2p5g-phy-firmware-internal. Remove it from
DEVICE_PACKAGES of the BPi-R4-mini until the an upcoming linux-firmware
release will come with this firmware included, allowing us to then
create that package.

Fixes: 8b6c6978d6 ("mediatek: add support for BananaPi BPi-R4 Lite")
Signed-off-by: Daniel Golle <daniel@makrotopia.org>
This commit fixes mistaken executable bit on dts files.

Signed-off-by: Aleksander Jan Bajkowski <olek2@wp.pl>
Link: https://github.com/openwrt/openwrt/pull/20676
Signed-off-by: Hauke Mehrtens <hauke@hauke-m.de>
The BPi-R4 Lite is a WiFi-7 router board based on the MT7987 SoC.

Specification :
 - SOC: Mediatek MT7987A (4x Cortex-A53
 - RAM: 2GB
 - Flash: 32MB SPI NOR, 256MB SPI NAND, 8GB eMMC
 - Switch: MediaTek MT7531AE
 - Ports : 4x LAN (1G), 1x SFP (via MT7531), 1x WAN (2.5G)
 - Buttons : Reset & WPS/Mesh
 - LEDs : Status (PWM), SFP
 - USB: on-board VIA VL817 USB3.1/USB2.0 hub
    * 1 - mPCIe B (SIM3)
    * 2 - NGFF-KEYB (SIM1)
    * 3 - USB-A connector
    * 4 - mPCIe A (SIM4)
 - mPCIe: 1x 8GT/s x2 or 2x 8GT/s x1 (configurable via bootloader)
 - RTC: PCF8563
 - mikroBUS socket with SPI, I2C and full UART
 - on-board HT42B534 USB-to-serial for Type-C console port
 - Power: USB Type-C PD 20V, or DC via barrel connector or JST-VH 3.96

Installation:
Uncompress *sdcard.img.gz and write to microSD card, eg. using 'dd'.
Use bootloader menu on the serial console to install SPI-NAND or SPI-NOR,
once installed to SPI-NAND you can use the bootloader menu to install to
eMMC. See instructions for BananaPi R3 for details.

Signed-off-by: Daniel Golle <daniel@makrotopia.org>
Import and clean DT and DT-overlay files from MediaTek's SDK to build
an image with various DT-overlays for the MT7987 reference board.

Signed-off-by: Daniel Golle <daniel@makrotopia.org>
Import patches to use cpufreq voltage calibration data from the efuse on
MT7988, and add support for MT7987.

Signed-off-by: Daniel Golle <daniel@makrotopia.org>
The MT7987 has two LVTS thermal sensors, one covering all CPU cores,
and one for the built-in 2.5GE PHY.
Add support for MT7987 to the LVTS thermal driver.
Thanks to Chad Monroe of Adtran for providing cleaned up patches for
Linux 6.6 which have been ported to Linux 6.12.

Signed-off-by: Daniel Golle <daniel@makrotopia.org>
Compared to MT7988 (NETSYSv3) the Ethernet Frame Engine of MT7987
has been slighly updated (NETSYSv3.1), among other things the packet
scheduler (shaper) has apparently been reworked.
Import patches for basic support of the Ethernet Frame Engine of the
MT7987 SoC.

Signed-off-by: Daniel Golle <daniel@makrotopia.org>
The MT7987 is mostly a stripped-down low-pin-count version of the
MT7988 without the 10GBit/s SerDes. Most existing drivers can be reused.
Import to-be-sent-upstream patches doing all the groundwork for
basic support for the MT7987 SoC, adding clk, pinctrl and pwm support.

Signed-off-by: Daniel Golle <daniel@makrotopia.org>